ネットワーク初心者のネットワーク構築(1)
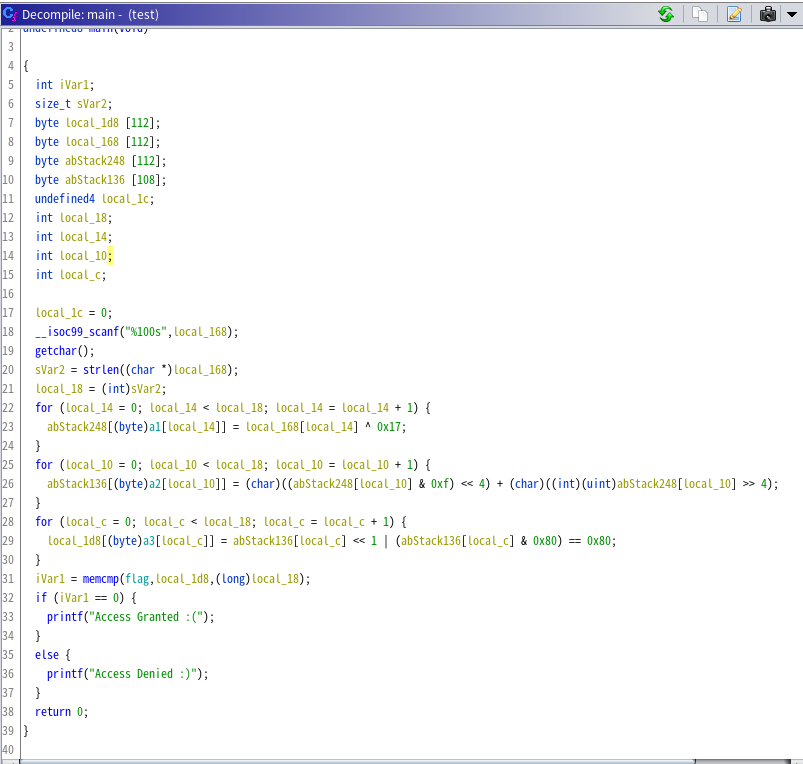
ネットワーク初心者が、Ciscoルータとスイッチでネットワークを組んでみた。使用した機器(ルータ1台(Cisco 1812-J)、スイッチ2台(Catalyst 2960G))と簡単な接続図は、以下の通り。目標は、すべてのPCと相互にやり取りが可能なネットワークの構築として、Pingが通ることを確認した。

IPアドレスの割り当て
同じネットワークで区別したいので、改めてIPアドレスを割り当てることにする。例えば、上の接続図において、左側のネットワークは192.168.10.Xにしたいので、以下のコマンドでIPアドレスを割り当てる。
今、PC1(Windows10)においてipconfigを実行したところ、以下のような出力があった。

したがってインターフェイス名とIPアドレスを、ターミナルに次のように入力する。
Windows10の場合
netsh interface ipv4 set address "イーサネット" static 192.168.10.1 255.255.255.0 192.168.10.254
(IPアドレス、サブネットマスク、デフォルトゲートウェイを設定する)
また、PC4(Kali Linux)では、イーサネットのインターフェース名(eth0)を選択し、ターミナルに次のように入力する。
Linuxの場合
(インターフェイスeth0のIPアドレスを、192.168.20.2に静的変更する)
ifconfig eth0 192.168.20.2 netmask 255.255.255.0
(デフォルトゲートウェイの設定)
route add default gw 192.168.20.254 eth0
ipconfigを実行し、次のような出力が得られればOK。(PC2での実行結果)

スイッチの設定
(1)設定モードに入る
Switch> en
Switch# configure terminal

ルーターの設定
最後に、ルーターについて、以下の設定を行う。これもコンソールポートから操作してほしい。
(1)設定モードに入る
Router> en
Router# configure terminal
Router(config)#
(2)VLAN1のインターフェイスを設定する(IPアドレスの設定)
Router(config)# int vlan 1
Router(config-if)# ip address 192.168.30.254 255.255.255.0
Router(config-if)# no shutdown
Router(config-if)# exit
(3)FE0 / FE1のインターフェイスを設定する
以下の画像のように、FE0ポートおよびFE1ポートにそれぞれのスイッチが接続されている。

それぞれについて、IPアドレスを設定してあげる。
Router(config)# int fastethernet 0
Router(config-if)# ip address 192.168.20.254 255.255.255.0
Router(config-if)# no shutdown
Router(config-if)# exit
Router(config)# int fastethernet 1
Router(config-if)# ip address 192.168.10.254 255.255.255.0
Router(config-if)# no shutdown
Router(config-if)# exit
次のコマンドで設定を確認する。(configure terminal から出ないとダメ)
Router# show runing-config
以下のように、FE0 / FE1ポートおよびVlan1について、正しく設定されているためOK。


Access Denied CTF 2022
This weekend, I participated the Access Denied CTF 2022. I solved a couple of reversing challenges and had really fun.
babyc

A file written in C was given. I didn't get what the FLAG was, but I could predict it. Therefore, I wrote a python script below and predicted some words.
#Python

flag = [-111, -47, -47, -79, -39, -39, 49, -79, 97, -127, -79, 49, -55, 9, 27, 89, -19, 59, 97, 49, -19, 89, -37, 121, -37, 89, -69, -37, -19, -111, 89, -37, -19, 113, -71, 97, -19, -101, 49, 49, 11, 91, -69, 11, -79, -87]


tmp = {-111:"a", -47:"c", -79:"e", -39:"s", 49:"d", 97:"n", -127:"i", -55:"{", 9:"x", -87:"}", 89:"r", -19:"_", 121:"v", -37:"3", -69:"5", 113:"f", -71:"u", 11:"8", 91:"2"}


for i in range(len(flag)):
    if (flag[i] in tmp):
        flag[i] = tmp[flag[i]]
print(flag)
Then, got flag.

Enormous

An ELF file was given. Many conditional branch were in there, so wrote a python script with angr below.
#Python - angr

import angr
import claripy

proj = angr.Project("./enormous")
state = proj.factory.entry_state()
sim = proj.factory.simulation_manager(state)
sim.explore(find=(0x400000+0x3950), avoid=(0x400000+0x3963))
if len(sim.found) > 0:
    print("Yes")
    print(sim.found[0].posix.dumps(0))
Then, got flag.

Binary

An ELF file was given. Below is the main function. Encoding an input and comparing it with the flag. Simple.

This is an encoding function.

In line 11, it generates a pseudorandom number which generates the same number regardless of the time of attempts (=means executions). In line 12, a variable "uvar3" will be 0. Between line 13 and line 15 are below.
(now - (flag[i] + 0 & 0x3fffffff)) & 0x7f
So, wrote a python script below. Global variable "flag" is an array of pseudorandom numbers. Global variable "tmp" are the contents of the flag in line 14 in the main function.
#Python

tmp = ["48","29","4c","58","44","72","2e","51","17","36","1f","0f","6d","5e","16","7a","6f","75","46","57","7e","19","57","75","29","4c","0d","14","68","7e","3b","4d","1a","1e", "79","30","10","3b","53","0a","11","3c","66","78","0e","1d","0f","36","60","66","4a"]

flag = [1804289383, 846930886, 1681692777, 1714636915, 1957747793, 424238335, 719885386, 1649760492, 596516649, 1189641421, 1025202362, 1350490027, 783368690, 1102520059, 2044897763, 1967513926, 1365180540, 1540383426, 304089172, 1303455736, 35005211, 521595368, 294702567, 1726956429, 336465782, 861021530, 278722862, 233665123, 2145174067, 468703135, 1101513929, 1801979802, 1315634022, 635723058, 1369133069, 1125898167, 1059961393, 2089018456, 628175011, 1656478042, 1131176229, 1653377373, 859484421, 1914544919, 608413784, 756898537, 1734575198, 1973594324, 149798315, 2038664370, 1129566413]


print(len(tmp), len(flag))

for i in range(len(flag)):

    # Decimal conversion
    now = "0x" + str(tmp[i])
    now = int(now, 16)


    ans = (now - (flag[i] + 0 & 0x3fffffff)) & 0x7f
    print(chr(ans), end='')

print("\n")
Then, got flag.

LLVM

A file wrote in Low Level Virtual Machine language was given. I did commands below, and made an ELF file.
llc  <file_name>.ll  (←generates .s file)
gcc  <file_name>.s  -o <ELF_file_name>
Used Ghidra and decompiled it. The main function is below.
This code can be divided into two parts: changing the index and changing the character. For example, the first character of the "flag" array is 2C and the index is 0, so we look for the index with the character "00" in the array a3. If the index of "00" in array a3 is 2E, the next step is to find the index of 2E in array a2. Doing the same for array a1, we finally find that 2C is the 60th characters of the flag. We took this way. A python script below is a solver for this problem. I didn't get all letters of the FLAG, but could predict some characters. I think that you can also guess it.
#Python

flag = ["2c", "2f", "2c", "cf", "cd", "09", "09", "4e", "09", "64", "2f", "cd", "0f", "c4", "6c", "84", "09", "8d", "84", "6f", "8c", "84", "6e", "ae", "09", "09", "4e", "8c", "6f", "c4", "64", "ac", "4e", "84", "24", "84", "a4", "8c", "8e", "8e", "ce", "e4", "6f", "e4", "2f", "8e", "09", "24", "4d", "8e", "4f", "8c", "ae", "4e", "e4", "8e", "a4", "6e", "64", "6e", "8c", "6c", "4f", "84", "6e", "6f", "09", "64"]

a1 = ["1e", "25", "0a", "3f", "1a", "04", "09", "31", "0e", "01", "40", "13", "15", "19", "38", "2b", "1f", "05", "1b", "43", "32", "02", "3a", "23", "1c", "3e", "20", "33", "2e", "27", "37", "00", "24", "1d", "3b", "0c", "41", "07", "3d", "22", "2c", "2a", "0d", "06", "42", "0b", "03", "08", "0f", "12", "36", "35", "26", "28", "30", "2f", "39", "29", "34", "10", "17", "18", "14", "3c", "11", "2d", "21", "16"]

a2 = ["10", "0a", "35", "38", "1b", "21", "20", "07", "3f", "05", "04", "01", "3d", "18", "0e", "2e", "2c", "1d", "3c", "1a", "40", "1c", "1f", "28", "06", "14", "15", "00", "30", "33", "09", "02", "43", "32", "3a", "0c", "12", "11", "17", "39", "25", "29", "19", "0d", "2d", "2a", "08", "16", "1e", "2f", "41", "26", "24", "27", "3b", "2b", "0f", "36", "23", "13", "0b", "22", "34", "3e", "03", "37", "31", "42"]

a3 = ["27", "3b", "3e", "07", "26", "16", "1e", "2d", "3a", "28", "03", "2b", "31", "02", "0a", "41", "1c", "37", "04", "34", "2a", "1b", "17", "3c", "1f", "12", "40", "14", "11", "22", "32", "30", "0e", "2e", "36", "18", "19", "3f", "0f", "33", "2f", "0b", "24", "1d", "38", "00", "0c", "35", "09", "21", "1a", "42", "01", "15", "13", "05", "08", "25", "2c", "43", "06", "23", "20", "3d", "0d", "39", "29", "10"]

# Changing the index part
ans = ["a" for p in range(68)]

for i in range(len(flag)):
    now1 = "0x" + flag[i]
    for j in range(len(a3)):
        now2 = "0x" + a3[j]
        if (i == int(now2, 16)):
            for k in range(len(a2)):
                now3 = "0x" + a2[k]
                if (j == int(now3, 16)):
                    for h in range(len(a1)):
                        now4 = "0x" + a1[h]
                        if (k == int(now4, 16)):
                            ans[h] = flag[i]
                            break
                    break
            break

#to replace words which alredy known.
tmp = {'ce':"a", '8e':"c", '4e':"e", '8c':"s", '6e':"d", '2f':"n", 'cf':"i", '8d':"{", '09':"_"}

for i in range(len(ans)):
    if (ans[i] in tmp):
        ans[i] = tmp[ans[i]]

# Changing the character part
def find_moji(x):
    import string
    string = string.ascii_letters + string.digits + string.punctuation
    for i in string:
        now = ord(i) ^ 0x17
        now = ((now & 0xf) << 4) + (now >> 4)
        now = (now << 1) or (now & 0x80) == 0x80
        if (str(hex(now)) == x):
            return i

for i in range(len(ans)):
    if (len(ans[i]) != 1):
        now = find_moji("0x" + ans[i])
        ans[i] = now

print(ans)
Did this, then got flag.

SECCON Beginners 2022 writeup
This weekend, I participated the SECCON Beginners CTF. I took some reversing problems and solved a couple of them.
Quiz

An ELF file was given when decompressed a given file.

In many rev challenge for beginner, the flags can be obtained by using the STRINGS command.
![]()
Recursive

An ELF file was given.
![]()
The main function of recursive is below.

In line 18, it compared correct FLAG with an input in line 15. If the input was correct, return value will be 0.
Now, let's see the check function.

In line 13, it compared whether the length of string was 1 or not.
Between line 19 and 21, it divided the string (which is param_1) into 2 equal parts. This was repeated until the length of string was 1, thus the name of this challenge was RECURSIVE.
In line 14, it compared with correct FLAG one character by one character.

I didn't know smart way to solve this, so using GDB and obtained the flag.
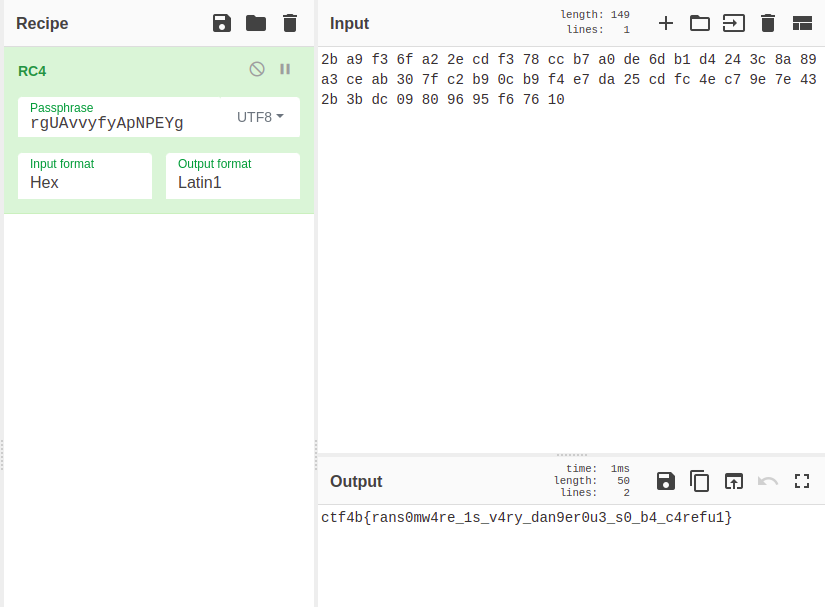
Ransom

An ELF file, a pcap file and an encrypted file were given.
![]()
Let's see the ELF file first.
FUN_001016a2 was the main function.
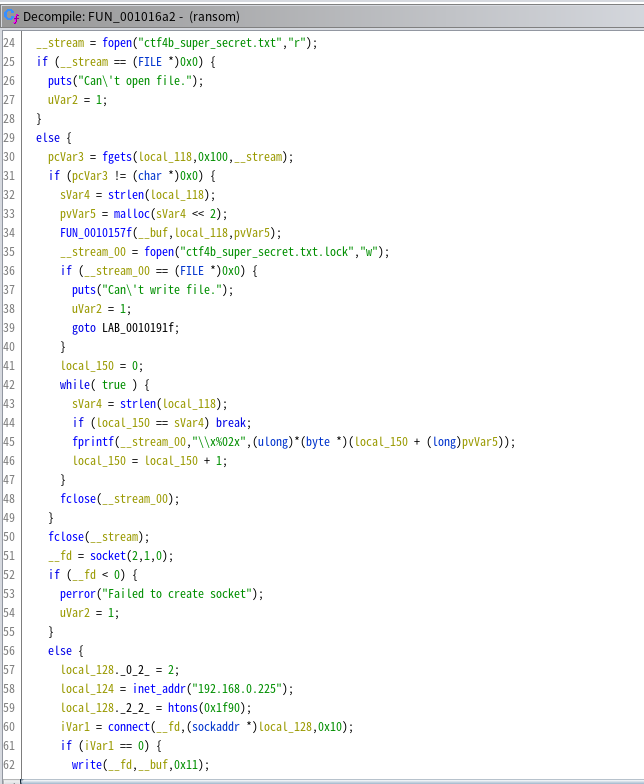
In line 45, the result of FUN_0010157f was written in line 34. It was sent to 192.168.0.255 in line 62.

It looked like a RC4 algorhythm. Therefore, the data sending to 192.168.0.255 was a key to decrypt it. Let's see the pcap file with WireShark.
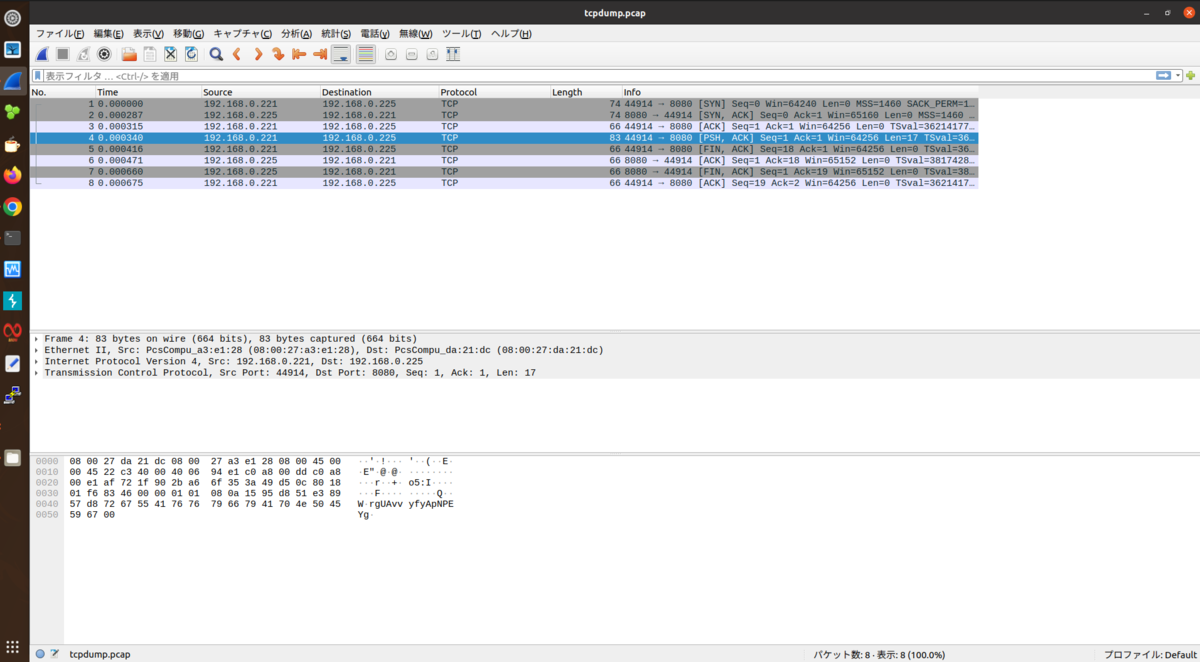
A string "rgUAvvyfyApNPEYg" was a key for encrypted file. Now, using Cyberchef, you can solved this challenge.
Ubuntu + XAMPPで Laravelの環境構築を行う
MdNから出版された「プロフェッショナルWebプログラミング Laravel」という題の書籍を用い、PHPのフレームワークでの開発手順を学習している。書籍では、Dockerを用いて環境構築を行っているが、個人的にUbuntu20.04、xamppで開発したかったのだが、案の定、環境構築で上手く行かなかったので対処方法などを示したい。
環境構築
まず、下記のコマンドでComposerをインストールし、chmodで実行権限を付与する。
curl -sS https://getcomposer.org/installer | php
mv composer.phar /usr/local/bin/composer
chmod +x /usr/local/bin/composer
特に何も表示されないので、バージョンを確認する。
composer --version
このような出力があればOK
![]()
次に、下記のコマンドでLaravelのインストールおよびアプリケーションの作成を行う。
composer create-project laravel/laravel <プロジェクト名> --prefer-dist

xamppのPHPのバージョンに合わせて、DOMをインストールする。(私の場合は、PHP7.4)
sudo apt install php7.4-dom
そして以前のディレクトリを削除し、再度プロジェクトの作成を行う。
composer create-project laravel/laravel <プロジェクト名> --prefer-dist
このように、緑色文字がバァーーっと表示されると多分成功。

最後にxamppのapache2を起動して、/localhost/<プロジェクト名>/publicにアクセスすると、以下のように表示される。これで環境構築は終わり。

htmlspecialchars関数で改行が反映されない件
自作サイトをPHPで制作した際に、躓いたが最終的には上手くいった箇所を、ブログに残したい。htmlspecialchars関数が思い通りに動いてくれないと感じている同胞の力になりたい。
![]()
原因
そもそもhtmlのtextareaを使って、入力した文字列をデータベースに保存。後にそれを表示したかった。
改行がない文字列であれば、思い通りの出力が得られる。しかし、改行を含む文字列の場合、データベースには改行コードも含まれて保存されているが、それを表示する際に改行が表示されない。その代わりに、空白(半角スペース)が表示される。おかしい。

解決方法
調べたところ、nl2br関数を使うと良いらしい。試してみたが、単にhtmlspecialchars関数に対して被せるだけでは、思い通りの出力は得られない。改行されるが、以下のように改行コードが含まれてしまう。これじゃない。
ccc<br />
ddd<br />
eee
試行錯誤の末、htmlspecialchars関数にnl2br関数を被せたものを、echoで出力させると思い通りの出力が得られることがわかった。私の場合は、以下の画像のように、PHPを組めば良かった。

すると、以下のように表示される。
